Dynamic Analysis
This step is a lot more involved, and is where the abstraction of the sample is largely built upon. "Dynamic Analysis" essentially involves executing the sample and observing what happens. This of course is not safe. If the sample turns out to be "Ransomware" - you've now lost your files. If it is capable of propagating via traversing a network, nice...You've now just infected your Local Area Network (LAN).
Regshot
Regshot is a widely used utility, especially when analysing malware on Windows. It works by creating two "snapshots" of the registry—one before the malware is run and another afterwards. The results are then compared to identify any changes.
Malware aims to establish persistence, meaning it seeks to run as soon as the device is switched on. A common technique for malware is to add a Run key into the registry, which is frequently used to specify which applications are automatically executed when the device is powered on.
Let's load up Regshot and create a capture of the registry as it currently exists. The shortcut to this has also been placed on the Desktop of the analyst machine.
First, change the output directory of the capture to the user's Desktop using the box with three dots in the "Output path" section.
Then, once set, let's create our first snapshot. Press 1st shot and then Shot on the dropdown. Please note that this may take a few minutes to complete.

Once we have executed our sample, let's return to Regshot and capture our second snapshot, using the same procedure as above. Click on the 2nd shot button and press Shot in the dropdown. Regshot is now capturing the registry again, and outputting the differences to a file.

And now, after a few seconds, let's press the Compare button that appears.

ProcMon
Next, we will explore using ProcMon (Process Monitor) from the Sysinternals suite to investigate today's sample. Proccess Monitor is used to monitor and investigate how processes are interacting with the Windows operating system. It is a powerful tool that allows us to see exactly what a process is doing. For example, reading and writing registry keys, searching for files, or creating network connections.
Open Process Monitor (ProcMon), the shortcut for this has been placed on the Desktop of the analyst machine. Process Monitor will automatically start capturing events of various processes on the system.

Now, execute the sample HopHelper.exe again and return to Process Monitor to see how it interacts with the operating system.
You will see a lot of information here. Do not worry, we will come onto how to filter this shortly.
After allowing a minute to pass, ensuring the sample has fully executed, we will now stop capturing. To stop capturing more events, click on the Play button in the toolbar of Process Monitor.

As you can see, there is a lot of information to scroll through here, with the most recent events at the bottom. Here we can see how various system processes are interacting with Windows. Nearly all of it, we don't care about.
Remember, the task content is demonstrating using Process Monitor for the demonstration sample downloader.exe.
You will need to follow along, but doing so for the HopHelper.exe.
Let's apply some filters. Afterall, for this demonstration, we only care about the downloader.exe sample. To do so, click on the Filter button, and then Filter within the dropdown.

A new window will open.

Here we can create some filters to remove some of the noise that we don't care about. Because we want to only look at this downloader.exe sample for this demonstration, we can apply a filter like so:
Apply the Process Name filter
Set the condition to is
Put in the name of the process we wish to see within the text area
Press the Add button to apply this filter
And finally click OK to save.

Once done, returning to the main Process Monitor window, we can already see the filter has worked.

Now it is much easier to investigate how the process is interacting with the operating system. Here are some Operations that may be of interest to us:
RegOpenKey
CreateFile
TCP Connect
TCP Recieve
However, as you can see, there is still a lot of information. We can further apply filters to look for specific things that we want to investigate, such as these aforementioned Operations.
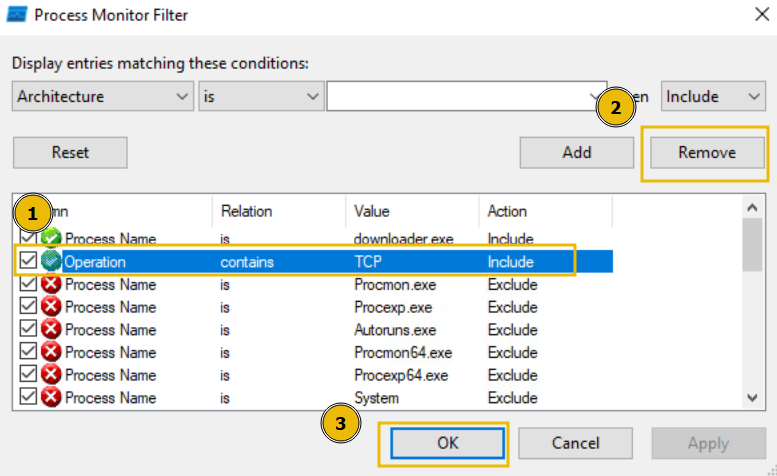
To do so, return to the Filter heading and create the filter we want to apply. For example, we can filter by Operations. Let's do so below, filtering for any TCP Operation:

We will now see all Operations that include TCP. Remember, you can remove the filters you've previously applied by pressing the filter in the Filter list, and pressing Remove:
Or, alternatively, if you wish to start over, you can simply press the Reset Filter option when clicking on the Filter heading.

Last updated